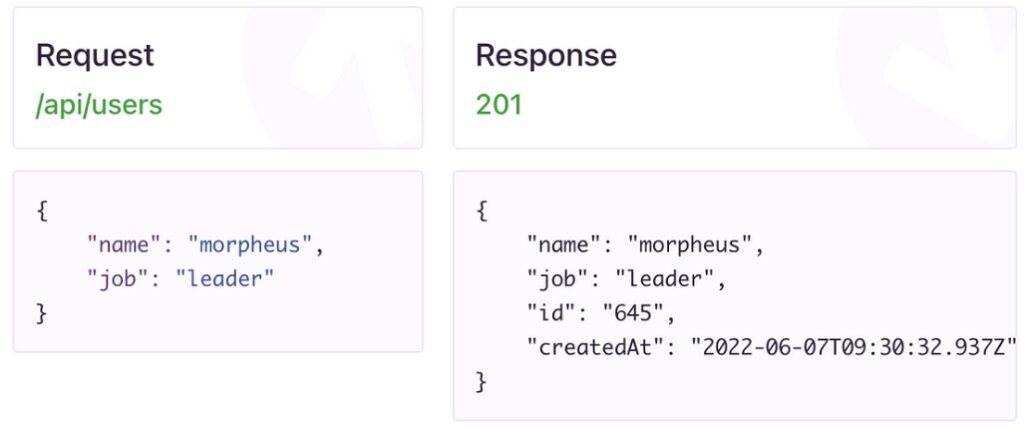
In this test method, we set our request data with values and execute the API. We use TestNg to validate the Response.
Happy Testing!

API Testing using Retrofit 2 and TestNG
Hi, In this blog we look at how Retrofit 2 and TestNg can be used to effectively test APIs. We will explore how to make API calls using Retrofit 2 and test the API responses using TestNG. Find how Retrofit makes these API calls using OkHttp here.
Retrofit is a type-safe HTTP client for Android, Java, and Kotlin developed by Square Open Source. It provides a very powerful framework for consuming APIs. Retrofit models a REST endpoint as a java interface and makes it super easy to get Responses from Web APIs and parse them into Plain Old Java Objects (POJOs).
Add Retrofit 2, Gson converter, and TestNg dependencies to your project:
					dependencies {
    //retrofit
    implementation('com.squareup.retrofit2:retrofit:2.6.0')
    //Gson
    testImplementation('com.squareup.retrofit2:converter-gson:2.9.0')
    //testng
    testImplementation('org.testng:testng:7.4.0')
}
Example API:
In this example, we use a Create User (POST) API: https://reqres.in/api/users

Request Model:
					public class CreateUserRequest{
   private String name;
   private String job;

   public CreateUserRequest(String name, String job) {
      this.name = name;
      this.job = job;
   }
}
Response Model:
					public class CreateUserResponse{
   private String createdAt;
   private String name;
   private String id;
   private String job;

   public String getName() {
      return name;
   }
}
Retrofit turns REST endpoints into Java Interfaces for easy Implementation. Let’s now create a User Client class. This class will include :
The API endpoints (api/users) are defined in this interface with the help of Retrofit2 annotations to specify API parameters, authorization, headers, body, etc. In our example, our POST API requires only a body parameter.
					public interface UserService{
    @POST("/api/users")
    Call
    createUser(@Body CreateUserRequest createUserRequest);
}
@POST annotation indicates it’s a POST request and we specify the API endpoint in it. The method createUser() returns a parameterized Call<T>. Its type should be the response type that the response has to be parsed into. Parameter createUserRequest is annotated with @Body to specify that the API requires a body of type CreateUserRequest. Find more information on how to use annotations to implement other parameters like headers, path, authentication, etc. here.
In this method, the Retrofit builder class is used to specify the base URL and build and return a Retrofit instance. We use Gson Converter to parse the response of the API to POJOs.
					public UserService createUserService() {
    Gson gson = new Gson();
    Retrofit retrofit = new Retrofit.Builder()
            .baseUrl("https://reqres.in/")
            .addConverterFactory(GsonConverterFactory.create(gson))
            .build();
    return retrofit.create(UserService.class);
}

private UserService userService = createUserService();
					public Response createUser(CreateUserRequest createUserRequest) throws IOException {
    Call createUserResponseCall = userService.createUser(createUserRequest);
    return createUserResponseCall.execute();
}
The createNewUser() method executes the API. It takes in a parameter of the type CreateUserRequest so that we can set our own data for user creation and pass it to the API. It returns a parametrized Response<T> of type CreateUserResponse after API execution and specifies it is an HTTP response.
We have created our API implementation and let’s look at how we can code a test case for the create user API.
					@Test
public void validateUserCreation() throws IOException {
    String name = "morpheus";
    String job = "leader";
    UserClient userClient =new UserClient();
    CreateUserRequest createUserRequest = new
    CreateUserRequest(name, job);
    Response createUserResponse =
    userClient.createUser(createUserRequest);
    Assert.assertEquals(createUserResponse.code(), 201);
    Assert.assertEquals(createUserResponse.body().getName(), name);
}
In this test method, we set our request data with values and execute the API. We use TestNg to validate the Response.
Happy Testing!
Share This Article

“Engineering Effectiveness” has been a central topic of discussion and focus this year

With us, you’re not just a part of a company; you’re part of a movement dedicated to pushing boundaries, breaking barriers, and achieving the extraordinary.

Otaku 2.0 sought to redefine the way we approach testing, celebrate the spirit of innovation, and pave the way for a brighter future in tech.