TestVagrant

Google Firebase Test Lab Integration For iOS Flutter Integration Testing

Google Firebase Test Lab Integration For IOS Flutter Integration Testing

Article

Google Firebase Test Lab Integration For iOS Flutter Integration Testing

Our previous blog post covered the integration of the Google Firebase test lab for Android tests. 

In this article, we will explore how to integrate our tests with Firebase Test Lab to run on iOS devices. We will provide a step-by-step guide on how to create a shell script that automates our test cases and runs them on Test Lab for iOS, with a detailed analysis of the resulting reports.

Pre-requisite :

  1. Make ensure that your team has set up a Firebase project. If not, please follow the official documentation to create a new project in Firebase.
  2. You must have the gCloud CLI set up on your system and have set up your project with the CLI. You can follow the instructions here: https://cloud.google.com/sdk/docs/install-sdk
  3. Xcode in Your System.
  4. cocoa pods
  5. Ensure that you can manually launch your app in the simulator, and fix any platform-related issues if necessary.

Execute tests on iOS

Step 1: Know Your Bundle ID

You need to locate the name of your bundleId, which can be found in “ios/Runner.xcodeproj/project.pbxproj”. In case you are unsure, I would recommend seeking assistance from a developer.

Step 2: Create RunnerTest Target

Open ios/Runner.xcworkspace in Xcode. Create a test target via File > New > Target.

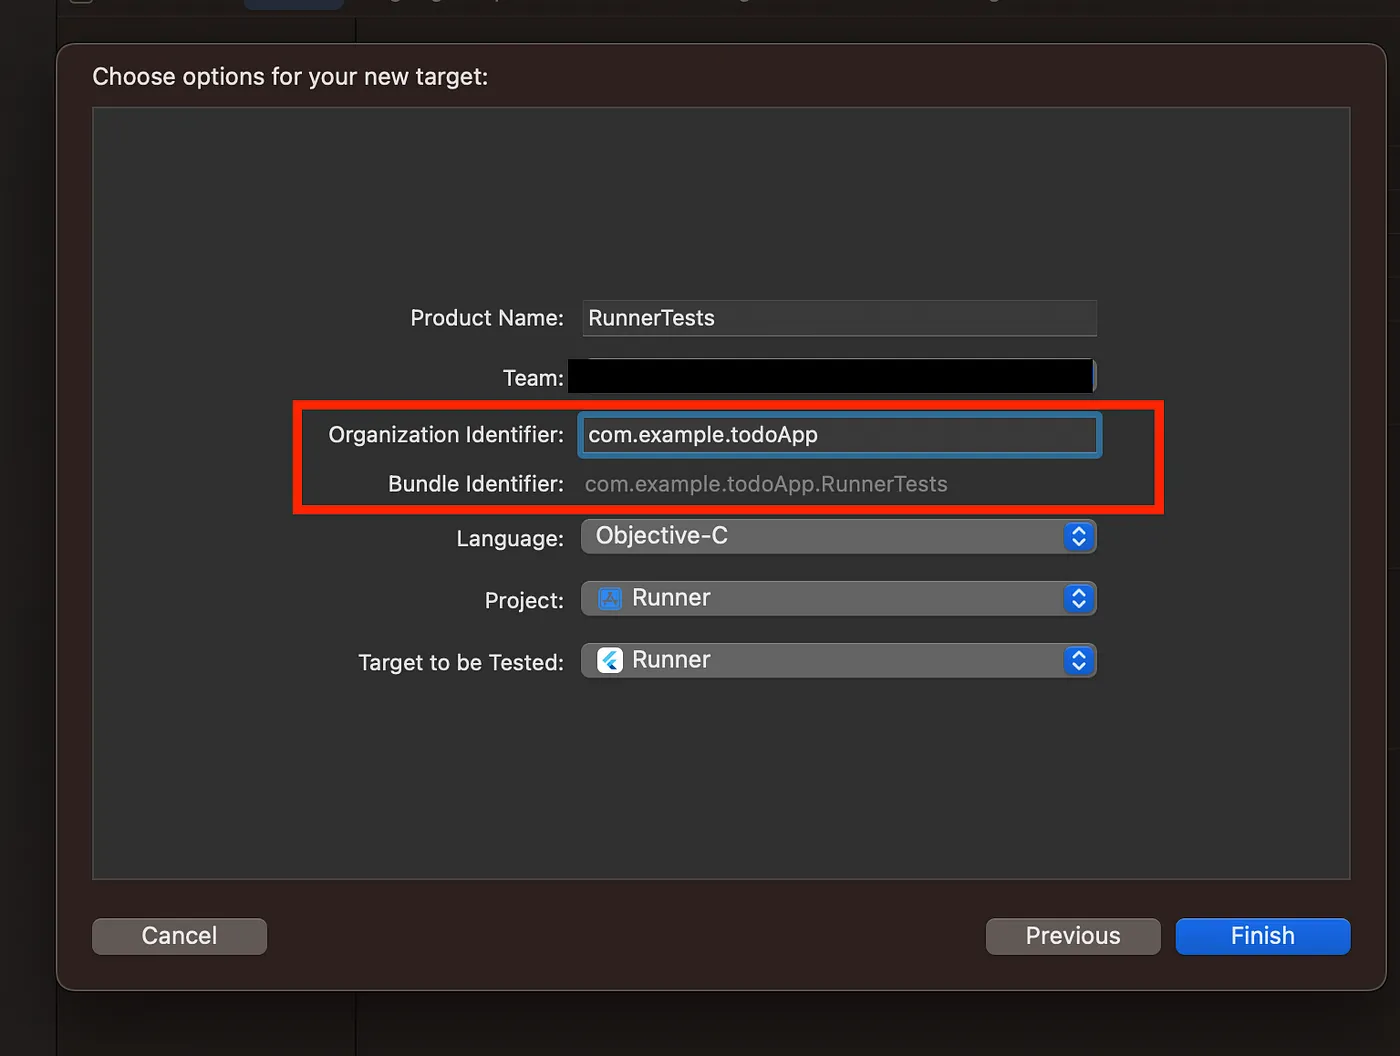
Select Unit Testing Bundle. Change the Product Name to RunnerTests Select Target to be Tested is set to Runner and language is set to Objective-C. Update Orginization Identifier as bundle ID which we identified in Step 1.

The above step will create ios/RunnerTests/RunnerTests.m file.

Update the file with the –

				
					@import XCTest;
@import integration_test;

INTEGRATION_TEST_IOS_RUNNER(RunnerTests)


Update your ios/Podfile file target ‘Runner‘ with –

				
					target 'Runner' do
  use_frameworks!
  use_modular_headers!

  target 'RunnerTests' do
    inherit! :search_paths
  end
end


If you get any Error on the ios/RunnerTest/RunnerTest.m file. Make sure to install the pods again. Run the commands –

				
					cd ios
pod deintegrate
pod install --repo-update


Step 3: Running Test on Local Machine with Xcode Product Test

To make sure the setup is correct, Run the test from Xcode. It will launch the simulator and run the tests.

Step 4: Running Test on Local Machine with Command Line

We will create one LocalRunner shell file to make sure, we are all good to run our tests on IOS from the command line.

Our local runner file will look like this –

				
					flutter build ios integration_test/tests/create_todo_test.dart --release

pushd ios
xcodebuild -workspace Runner.xcworkspace -config Release -derivedDataPath ../build/ios_integ -sdk iphoneos build-for-testing
popd

# To Run Test In Local
xcodebuild test-without-building \
  -xctestrun "build/ios_integ/Build/Products/dev_iphoneos16.2-arm64.xctestrun" \
  -destination 'platform=iOS Simulator,name=iPhone 14 Pro Max'


Now we will look into the details of each step in the above file.

To build an iOS IPA file that points to our tests, we will use the following command –

				
					flutter build ios integration_test/tests/create_todo_test.dart --release


The way we run our tests from Xcode, we have to do it via CMD. Xcode internally builds the app and then runs the tests. same we will do, first we will combine the IPA with resources.

Ensure that you are in the “ios” folder and use the command –

				
					xcodebuild -workspace Runner.xcworkspace -config Release -derivedDataPath ../build/ios_integ -sdk iphoneos build-for-testing


Once you run the above command, a folder will be generated at “build/ios_integ/Build/Products” containing the IPA product resources. The name of the test runner will be “Runner_iphoneos$dev_target-arm64.xctestrun”, where the value of “dev_target” may vary based on the Xcode version.

For the latest version, it is 16.4, so the runner file name would be “Runner_iphoneos16.4-arm64.xctestrun”.

				
					dev_target=16.4


Now, we need to zip the product and test runner.

				
					pushd build/ios_integ/Build/Products
zip -r "ios_tests.zip" Release-iphoneos Runner_iphoneos16.2-arm64.xctestrun
popd


Step 5: Create an Authentication key in Firebase

We will create an authentication key in Firebase. Firstly, we need to log in to our gCloud account and select the Service account. Then, we will be presented with the option to perform actions on the “firebase-adminsdk” account.

Select the “Manage Key” option and proceed to create a new key. You should store this key in your local system, and you will be given the option to save it in JSON format.

Step 6: Setting gCloud , upload zip file which includes Test Runner and IOS products

We will be setting up gCloud and uploading the zip to Firebase Test Lab. We will be writing a script to authenticate gCloud and perform the upload process. Each step in this process will be explained in detail.

				
					gcloud auth activate-service-account --key-file=gcloud_key_file.json
gcloud --quiet config set project 
gcloud firebase test ios run \
  --test "build/ios_integ/Build/Products/ios_tests.zip" \
  --device=model=iphone11pro,version=16.2


Let’s understand the meaning of each step –

				
					gcloud auth activate-service-account --key-file=


This step will authenticate your system using the downloaded credential keys. We will explain how to store these keys when running on GitHub or Codemagic to ensure security in the upcoming blog post. For now, we will be storing the keys locally in this blog post.

				
					gcloud --quiet config set project 


In our local system, we might have authenticated multiple projects for the same gcloud accounts. The previous step will set the project at runtime for which you want to run the tests.

				
					gcloud firebase test ios run \
  --test "build/ios_integ/Build/Products/ios_tests.zip" \
  --device=model=iphone11pro,version=16.2


This step will upload the zip test to Firebase Test Lab for IOS tests.

Step 7: Runner.sh file

Now that we have combined all the steps, our runner file will look like the following, and it will be responsible for running tests on Firebase Test Lab.

				
					output="../build/ios_integ"
product="build/ios_integ/Build/Products"
dev_target="16.2"
PRODUCT_NAME="Release-iphoneos"
TEST_RUNNER="iphoneos$dev_target-arm64.xctestrun"

flutter build ios integration_test/tests/create_todo_test.dart --release

pushd ios
xcodebuild -workspace Runner.xcworkspace -config Release -derivedDataPath $output -sdk iphoneos build-for-testing
popd

pushd $product
zip -r "ios_tests.zip" $PRODUCT_NAME $TEST_RUNNER
popd

gcloud firebase test ios run \
  --test "build/ios_integ/Build/Products/ios_tests.zip" \
  --device=model=iphone11pro,version=16.2


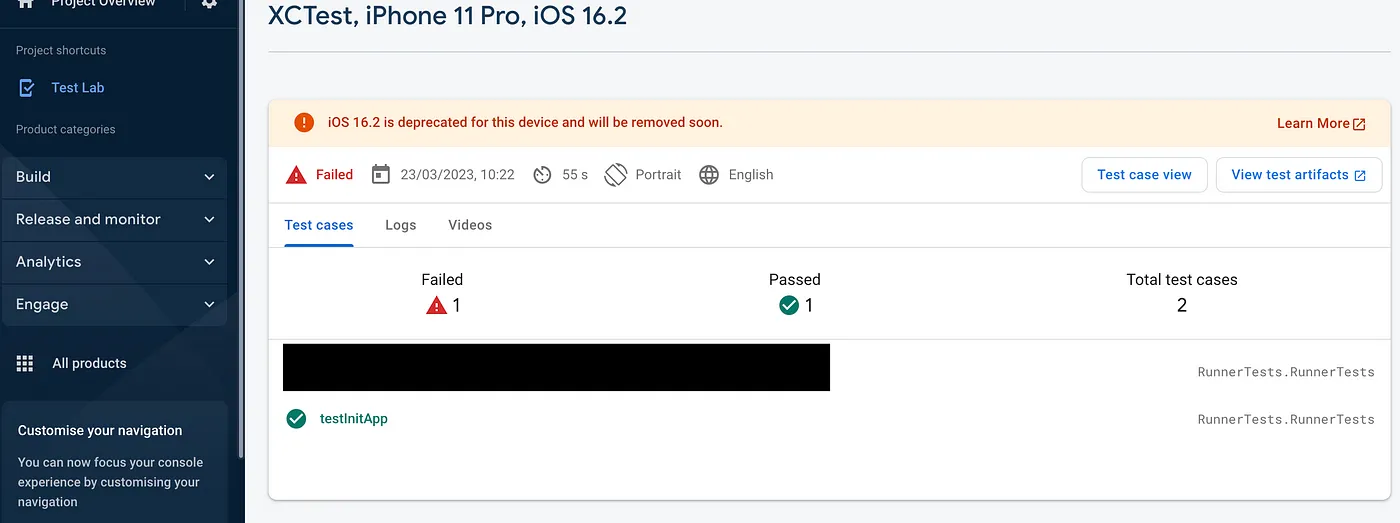
After running the runner.sh file, it will upload the tests to Firebase Test Lab, and the results will be displayed on the test lab.

In the screenshot above, we can see that our product was uploaded, the tests were run, and a summary of the results was provided. If you click on the link provided at the bottom that says “More details available at…”, it will redirect you to the Firebase Test Lab results page.

Congratulations! You are all good to run tests on the Firebase test lab for IOS.

Read the next blog of the series here to know more about some insider tips and tricks. 

Other Related Articles

Share This Article

Scroll to Top