Test Observability & Engineering effectiveness
“Engineering Effectiveness” has been a central topic of discussion and focus this year

How to build a Real-time Test Case Monitoring solution using logs?
In the dynamic world of software development, it’s super important to test and report issues to deliver quality products. If you’ve been doing software testing, you’ve probably encountered various testing frameworks, each with its own features and reporting mechanisms. That’s where Allure Server Standalone comes into play — as your trusted companion in test reporting.
But what exactly Allure Server Standalone is?
Allure Server Standalone is a handy tool that pairs well with Allure Test Report framework. It’s like a user-friendly dashboard that gives a clear view of your test results from different testing tools. Basically, it offers an easy-to-use interface, so you and your team can see and interpret your test reports without diving into allure command lines or any other technical stuff. In short, it serves as your go-to platform for straightforward test reporting and analysis.
Key features of Allure Server Standalone
Approaches to using Allure Framework
As we all know, Allure Framework generates eye-catching reports for automated test cases. However, there are three ways to use this tool effectively –
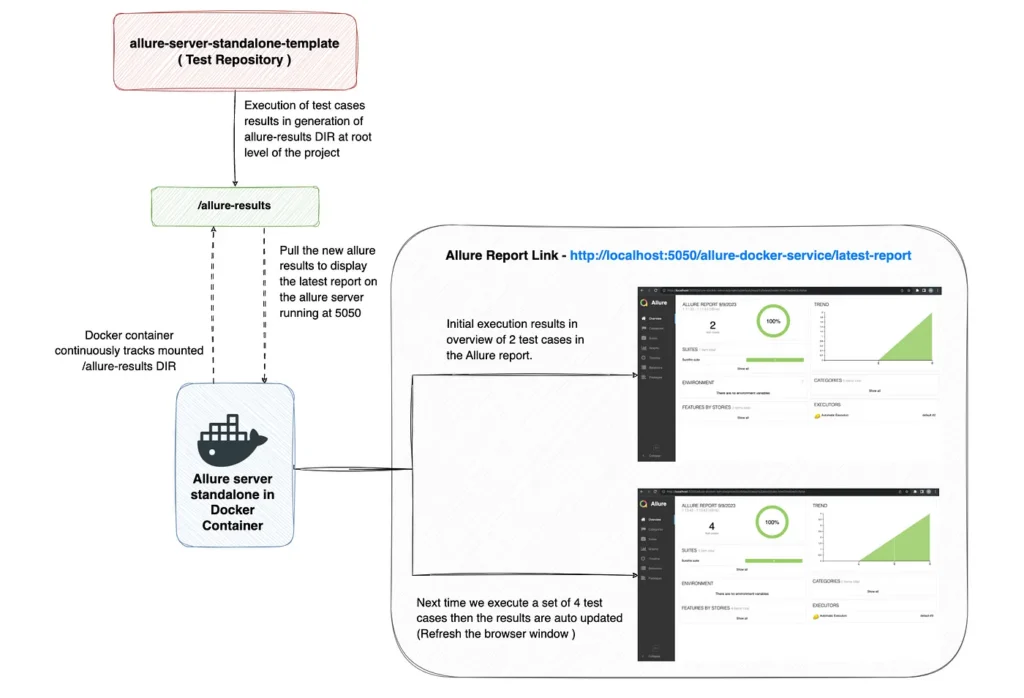
The first two ways can be a bit of a hassle and that’s where the Docker container comes to the rescue which allows us to access the latest report by simply mounting your allure-results directory (linking your ‘allure-results’ directory to allure container volume) using shell script file and voilà! No need for a complex setup or commands — just get straight to your report hassle-free.

Now that you’re familiar with the immense power and flexibility that a standalone Allure server offers, it’s time to roll up your sleeves and get your hands dirty with code.
Let’s begin by cloning the allure-server-standalone-template project which is based on Java and TestNG. This project comes with a basic setup of test cases designed to generate real-time, refreshable reports right on your local machine.
Once you’ve cloned the repository, the next step is to get Docker up and running on your machine. If you haven’t already installed it, you can download it from here.
After installing Docker, open Docker Desktop and keep it running throughout the entire process. Next, navigate to Docker Hub and obtain the Allure Docker service image required for our project. You can pull this image directly from your terminal using the following command –
docker pull frankescobar/allure-docker-service
mvn clean test -Dtest=com.example.SetOfTwoTestCase
Upon successful test execution, you’ll notice that an allure-results directory has been generated at the root level of our project. This directory will be mounted so that Allure Docker service can track the latest results.
Now, launch the Allure service by running the following Docker command:
					docker run -p 5050:5050 -e CHECK_RESULTS_EVERY_SECONDS=3 -e KEEP_HISTORY=1 \
frankescobar/allure-docker-service
This Docker command runs a container with the ‘frankescobar/allure-docker-service’ image. It maps port 5050 from the host to port 5050 in the container, making the service accessible on the host machine. Additionally, it sets environment variables: “CHECK_RESULTS_EVERY_SECONDS” variable determines how often the service should check for new test results, and “KEEP_HISTORY” specifies whether to keep historical test data or not.
Next, We will be using a shell script file to interact with Allure server. Basically, this script is required to automate the process of managing and transmitting test results to an Allure server and it is particularly useful in scenarios where you have frequent test runs and want to streamline the reporting and visualization of the latest test results
					#!/bin/bash
# This directory is where our local results are stored and it is generally named as `allure-results`
ALLURE_RESULTS_DIRECTORY='allure-results'

# This url is where the Allure container is deployed. Use `localhost` when allure server is running in local
ALLURE_SERVER='http://localhost:5050'

# Project ID according to existent projects in your Allure container - Check endpoint for project creation >> `[POST]/projects`
PROJECT_ID='default'
#PROJECT_ID='my-project-id'

DIR="$( cd "$( dirname "${BASH_SOURCE[0]}" )" >/dev/null 2>&1 && pwd )"
FILES_TO_SEND=$(ls -dp $DIR/$ALLURE_RESULTS_DIRECTORY/* | grep -v /$)
if [ -z "$FILES_TO_SEND" ]; then
  exit 1
fi

FILES=''
for FILE in $FILES_TO_SEND; do
  FILES+="-F files[]=@$FILE "
done

set -o xtrace
echo "------------------CLEAN-RESULTS------------------"
curl -X GET "$ALLURE_SERVER/allure-docker-service/clean-results?project_id=$PROJECT_ID"

echo "------------------SEND-RESULTS------------------"
curl -X POST "$ALLURE_SERVER/allure-docker-service/send-results?project_id=$PROJECT_ID" -H 'Content-Type: multipart/form-data' $FILES -ik
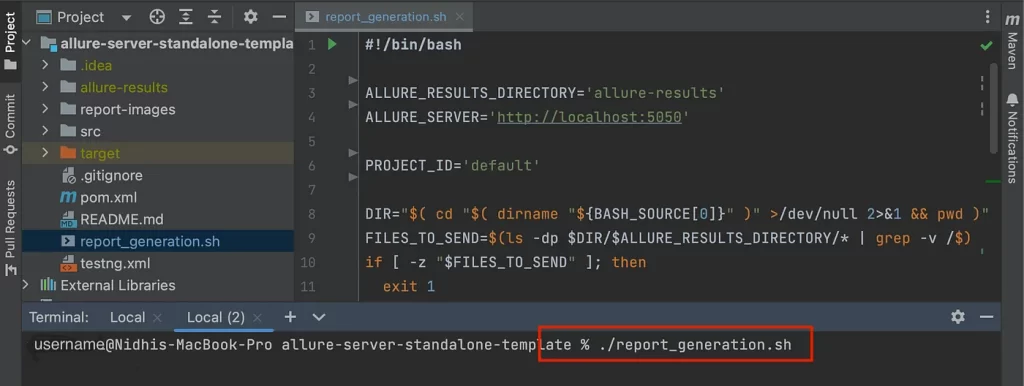
In the provided repository, you’ll find a shell script file named ‘report_generation.sh’ which contains the script mentioned above. we just need to specify the directory where local results, typically named ‘allure-results, are stored, and the URL of the Allure server (use ‘http://localhost:5050’ when running locally). The script then locates and prepares files for transmission to the server. It sends a request to clean existing results and upload the new ones to the Allure service using cURL commands.
Now, open a new terminal window in your IDE and execute ‘report_generation.sh’ file using command — “./report_generation.sh”.If you encounter a ‘permission denied’ error, resolve it by executing the command ‘chmod +x report_generation.sh’ to grant execution permission to the file. Afterwards, you can run the ‘report_generation.sh’ script again using the command ‘./report_generation.sh’.

You’re almost there. Just fire up your web browser and head over to http://localhost:5050/allure-docker-service/latest-report to check out your latest Allure report.
Did you know? Allure has this really useful feature where you can easily see the history of your test reports. All you’ve to do is click on the Allure logo, and it’ll take you to a page at “http://localhost:5050/allure-docker-service/projects/default“. Here, you’ll find a list of html files, each one presenting a report from previous tests, making it easy to track your testing history.

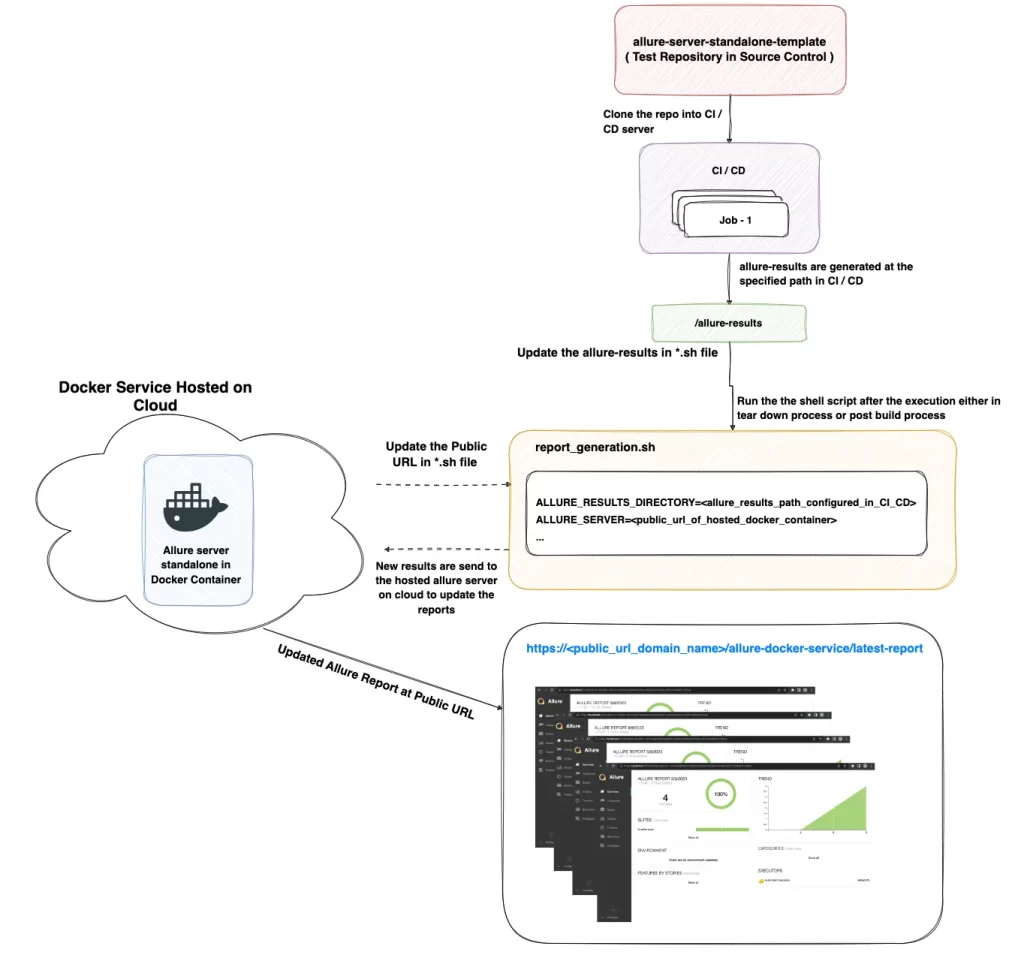
In our previous discussions, we delved deep into leveraging Allure Server Standalone for local test reporting. Now, we’re scaling that up, moving from a local environment to the cloud and integrating the entire process into a CI/CD pipeline.
The cloud is not just a buzzword; it’s a way to ensure that our entire team, irrespective of their location, can access and view our Allure reports. By deploying the Allure service in a cloud container, we transform our reports from being a local asset to a globally accessible resource.
In order to harness the advantages of cloud service, we must deploy our Docker container with ‘frankescobar/allure-docker-service’ image to a cloud-based platform. For those already acquainted with Docker, think of it as taking your local container orchestration to a cloud level where it can be accessed publicly. Again, the command to launch the container remains the same as shown below and the report files will be sent to this service via the shell script we discussed earlier.
					docker run -p 5050:5050 -e CHECK_RESULTS_EVERY_SECONDS=3 -e KEEP_HISTORY=1 \
frankescobar/allure-docker-service
Post-deployment, you’re assigned a public URL for your Allure service. This URL serves as a centralized dashboard, where reports can be accessible to the entire team.
Automating Report Uploads with a Shell Script
The true power of automation in a CI/CD pipeline lies in scripts. A well-crafted script can save hours of manual work. In our scenario, a shell script will take care of pushing our Allure results to the deployed Docker container. Our shell script file will remain mostly unchanged, as previously discussed, with just a couple of modifications.
The shell script can be integrated into your project or workflow in two primary ways:
The choice largely depends on your specific needs. However, integrating it directly into the CI/CD pipeline is generally more efficient for teams that rely heavily on continuous integration and deployment. It streamlines the entire process and makes sure that the most recent test results are always pushed to the Allure service without manual intervention.
In conclusion, Allure Server Standalone streamlines the often complex process of software testing and reporting. Its user-friendly interface and cloud-ready capabilities make it a go-to solution for teams looking for seamless collaboration and data-driven insights. By integrating it into your CI/CD pipeline, you elevate test reporting to a new level of efficiency and accessibility.
Thank you for exploring this versatile tool !!
Happy Learning !!!
References :
https://github.com/fescobar/allure-docker-service
https://docs.docker.com/get-started/overview/
Share This Article

“Engineering Effectiveness” has been a central topic of discussion and focus this year

With us, you’re not just a part of a company; you’re part of a movement dedicated to pushing boundaries, breaking barriers, and achieving the extraordinary.

Otaku 2.0 sought to redefine the way we approach testing, celebrate the spirit of innovation, and pave the way for a brighter future in tech.