Test Observability & Engineering effectiveness
“Engineering Effectiveness” has been a central topic of discussion and focus this year

Get started with App testing using Espresso
Espresso is used to write concise and reliable Android UI Automation Test cases. To make best use of Espresso, one should be familiar with the codebase under test. One of the important features in Espresso is that it automatically synchronizes your test actions with the user interface of your application.
The main components of Espresso include the following:
Lets get started on writing first test with Espresso.

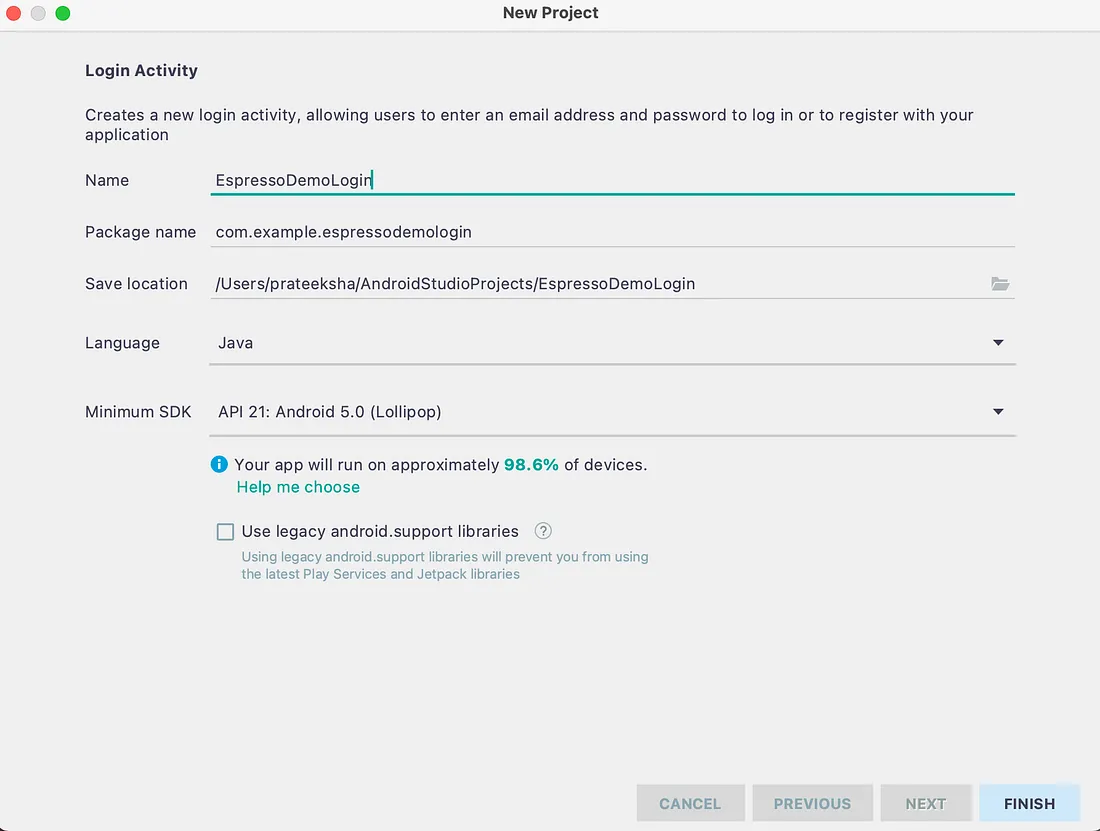
3. Enter name of the project and click on Finish button

4. Let gradle build task complete
Once the gradle task is complete and project is loaded, Open your app’s build.gradle file. This is usually not the top-level build.gradle file but app/build.gradle and Add the following lines inside dependencies:
					androidTestImplementation ‘androidx.test.espresso:espresso-core:3.4.0’
androidTestImplementation ‘androidx.test:runner:1.4.0’
androidTestImplementation ‘androidx.test:rules:1.4.0’
Add below line to the same build.gradle file in android.defaultConfig:
testInstrumentationRunner = “androidx.test.runner.AndroidJUnitRunner”
Updated build.gradle would look like as below and Sync you project to use the added dependencies
					plugins {
    id 'com.android.application'
}

android {
    compileSdk 31

    defaultConfig {
        applicationId "com.example.espressodemologin"
        minSdk 21
        targetSdk 31
        versionCode 1
        versionName "1.0"

        testInstrumentationRunner "androidx.test.runner.AndroidJUnitRunner"
    }

    buildTypes {
        release {
            minifyEnabled false
            proguardFiles getDefaultProguardFile('proguard-android-optimize.txt'), 'proguard-rules.pro'
        }
    }
    compileOptions {
        sourceCompatibility JavaVersion.VERSION_1_8
        targetCompatibility JavaVersion.VERSION_1_8
    }
    buildFeatures {
        viewBinding true
    }
}

dependencies {

    implementation 'androidx.appcompat:appcompat:1.3.0'
    implementation 'com.google.android.material:material:1.4.0'
    implementation 'androidx.annotation:annotation:1.2.0'
    implementation 'androidx.constraintlayout:constraintlayout:2.0.4'
    implementation 'androidx.lifecycle:lifecycle-livedata-ktx:2.3.1'
    implementation 'androidx.lifecycle:lifecycle-viewmodel-ktx:2.3.1'
    testImplementation 'junit:junit:4.13.2'
    androidTestImplementation 'androidx.test.ext:junit:1.1.3'
    androidTestImplementation 'androidx.test.espresso:espresso-core:3.4.0'
    androidTestImplementation 'androidx.test:runner:1.4.0'
}
Android Studio creates tests by default in src/androidTest/java/com.example.espressodemologin/
1. Create a new java class in the folder specified above
2. Name it as ‘LoginInstrumentedTest’
3. Add @RunWith(AndroidJUnit4.class) at the top of the class
4. Add Rule inside class to perform test on Login Activity
					@Rule
public ActivityScenarioRule activityRule =
new ActivityScenarioRule(LoginActivity.class);
5. Add Test in the test class as below
					@Test
public void loginTest() {
onView(withId(R.id.username)).check(matches(isDisplayed()));
      onView(withId(R.id.username)).perform(ViewActions.typeText("username@gg.com")).check(matches(withText("username@gg.com")));
    onView(withId(R.id.password)).perform(ViewActions.typeText("password")).check(matches(withText("password")));
    onView(withId(R.id.login)).perform(ViewActions.click());
}
6. Import all required packages/classes
The completed test should look as below:
					package com.example.espressodemologin;

import static androidx.test.espresso.Espresso.onView;
import static androidx.test.espresso.assertion.ViewAssertions.matches;
import static androidx.test.espresso.matcher.ViewMatchers.*;

import androidx.test.espresso.action.ViewActions;
import androidx.test.ext.junit.rules.ActivityScenarioRule;
import androidx.test.ext.junit.runners.AndroidJUnit4;

import org.junit.Rule;
import org.junit.Test;
import org.junit.runner.RunWith;

import com.example.espressodemologin.ui.login.LoginActivity;

@RunWith(AndroidJUnit4.class)
public class LoginInstrumentedTest {
    @Rule
    public ActivityScenarioRule activityRule =
            new ActivityScenarioRule(LoginActivity.class);

    @Test
    public void loginTest() {
        onView(withId(R.id.username)).check(matches(isDisplayed()));
        onView(withId(R.id.username)).perform(ViewActions.typeText("username@gg.com")).check(matches(withText("username@gg.com")));
        onView(withId(R.id.password)).perform(ViewActions.typeText("password")).check(matches(withText("password")));
        onView(withId(R.id.login)).perform(ViewActions.click());
    }
}
You may now run the test by clicking on run icon for test or class

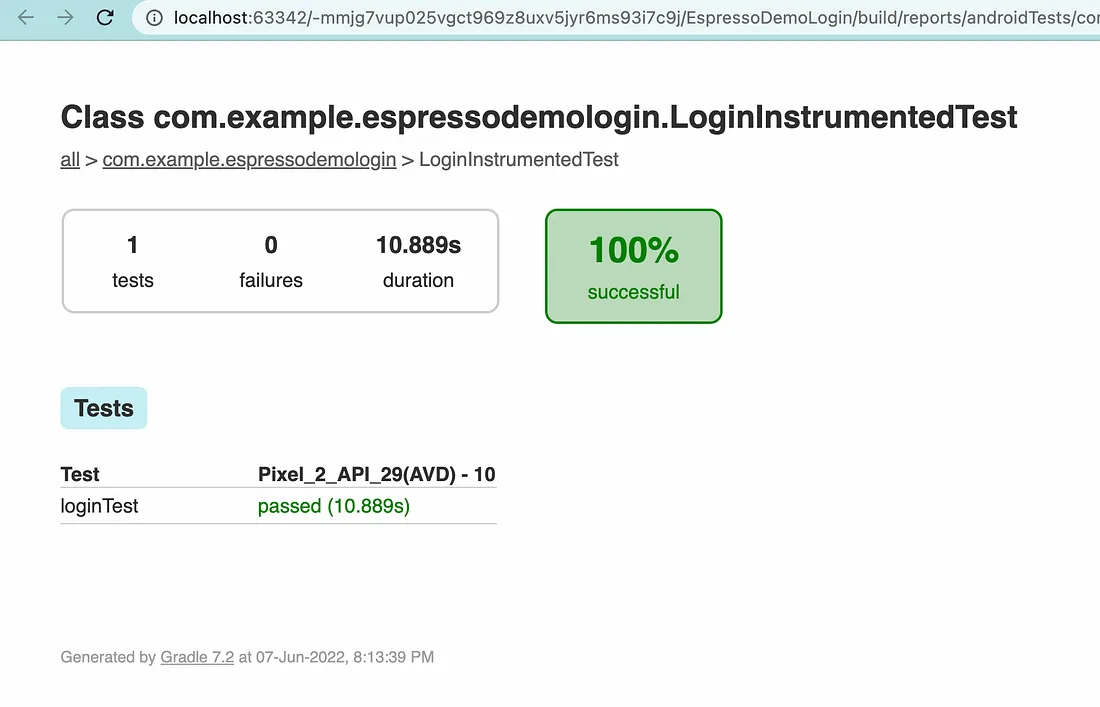
Once tests are executed, report is created under app/build/reports/androidTests/connected folder.
index.html file contains result for all the tests. Open this file in a browser to view the report.

In the next blog, we will write more tests and talk about how to create custom matchers to assert toast message.
Happy Testing!!

“Engineering Effectiveness” has been a central topic of discussion and focus this year

With us, you’re not just a part of a company; you’re part of a movement dedicated to pushing boundaries, breaking barriers, and achieving the extraordinary.

Otaku 2.0 sought to redefine the way we approach testing, celebrate the spirit of innovation, and pave the way for a brighter future in tech.